Making relative Adobe asset paths work in Post Haste templates
If you're using Post Haste to create templates for your Adobe project files, you may have run into an issue where the project file still points to assets in their original location on disk, not relative to the template path.
Here's how to get relative paths working:
- Create a new folder to temporarily store the files.
- Recreate the relevant folders from your template. So if you store video in a Media folder and the project file in a Projects folder, create those folders inside the new directory.
- Copy (not move) the assets and project files into the folders you created, exactly the way they are setup in the template.
- Open up the project in your Adobe app and relink to the assets inside the temporary folder, then save the project and close it.
- Â Move the project folder from the temporary directory back into your Post Haste template, overwriting the project file if it's already there.
- Delete the temporary folder.

Post Haste is a free app for Mac and PC that makes it easy to create new projects from templated folder structures. To find out more, check out the feature list, read the user manual or download the app for Mac or PC.
Posted by Jon Chappell on Jan 26 2018 to
Pro Media Tools,
TutorialsPermalinkHow to import sequences into Premiere Pro from XML without duplicating media
Premiere Pro stores metadata that helps it determine which files exist in a project, however when roundtripping via XML through a non-Adobe app this metadata can get lost, resulting in Premiere duplicating all of the existing media in the project upon import.
Here's how to prevent that:
- Create a new, temporary Premiere project. Because Premiere can only open one project at once, your current project will close.
- Import the XML file into the temporary project and save it. Relink any files that need it.
- Reopen your main project.
- Click the Media Browser tab at the bottom left and browse to the location of the temporary project on your hard drive. Select it and after Dynamic Link has loaded, the contents of the temporary project will appear in the Media Browser.
- Navigate to your imported sequence and double-click it to load it in the Source Monitor in the top left.
- Drag the video from the Source Monitor into your project / bin to import it into the project. Premiere may reimport certain things like titles but your media files will not be duplicated.
Posted by Jon Chappell on Dec 14 2016 to
Adobe,
Tutorials,
Video EditingPermalinkARRI Alexa dailies workflow with DaVinci Resolve 12
I've been working on a feature film shot on the ARRI Alexa and Alexa Mini and had to come up with a workflow for syncing and rendering out dailies. DaVinci Resolve 12 proved useful because all of the prep work could be done in one application all at once, with the added bonus of being able to roundtrip again after picture lock.
Step 1: Offloading
I used our very own Auto Transfer tool to offload the memory cards to two hard drives at once with checksum authentication to ensure the copies were identical to the source files. The media files were then backed up to LTO tape at the end of the day.
 Step 2: Organize and sync clips
In Resolve 12, create a new project, then go to File > Project Settings and switch off Use local version for new clips in timeline from the Color page. This will be important later on.

Then bring the video and audio files into your Media Pool and organize them in whatever manner makes sense to you. I chose to create bins for each scene (be careful what names you choose for the bins).
On this particular movie no audio was shot in-camera so the only way to automatically sync audio and video is by timecode. Select the video and audio files in your bin, right-click and choose Auto-sync Audio Based on Timecode.

In theory this is all you should need to do to get perfect sync, but in practice timecode can drift or it may be set incorrectly (or not at all) in the camera or sound recorder.
An additional reason for splitting things into bins is because if you are shooting time-of-day timecode, you may have multiple clips with the same timecode that could confuse Resolve and cause it to sync clips up to audio from a different scene.
In the event that the audio is not synced correctly, open the video in the viewer, scrub to the exact frame that the slate hits on and write down the timecode for that frame. Then open up the audio file and stop it on the exact frame that you hear the clap of the slate (in a lot of cases this will be an obvious short spike in the waveform towards the beginning of the file). Then right-click the audio file in the Media Pool and select Clip Attributes. In the Timecode pane, enter the timecode from the video you noted down earlier. Then repeat the earlier step of selecting the video and audio files, right-clicking and choosing Auto-sync Audio Based On Timecode again.
(If you can't hear the slate, go to the Audio pane of Clip Attributes and make sure your extra audio channels aren't muted.)

This will modify the timecode of the audio file so it can then be matched up automatically. You may be wondering why automatic matching is so important when you could just manually sync clips in a sequence. There is an important reason for this that will be clear later on.
Now select all the video clips then right-click and select Create Timeline Using Selected Clips.
Step 3: Grading
Open the timeline then switch to the Color tab and grade the clips as you normally would.
Step 4: Render
In the Deliver tab, choose the Individual source clips option under Render timeline as and Use source filename under Save as. This will export each clip in the sequence as an individual movie file with the same filename as its original source file - this is important to make it easy to reconnect back to the high-res source files later. Because these are offline clips we're rendering as ProRes Proxy to keep file sizes small but keeping the resolution the same as the source files.

This is why it was necessary to auto-sync the clips in the earlier step. I could find no way to manually sync audio clips and then link the audio back to the original source file. That synchronization will only exist in the sequence itself and is ignored if you choose the Individual Source Clips option.
Mark in and out points on the timeline at the bottom of the Deliver page to make sure it's going to render out all of the clips, then click Add to Queue. It's easiest to queue up lots of sequences and render them all out in one go.
Step 5: Edit
Import the rendered proxy files into the NLE of your choice and edit.
Step 6: Roundtripping back to Resolve
After editorial, export an XML from your NLE and reimport back into your Resolve project. (With Avid you need to export an AAF and things become a bit more complicated but this is covered in the user manual.)
On the Load XML dialog, deselect Automatically import clips into media pool (because they already exist in the media pool) and deselect Use color information if you edited in FCPX. Then click Ok.

Resolve should present you with a timeline from your NLE, however often things will not translate fully and need to be fixed. A great way to do this is to render out the full sequence from your NLE and then navigate to it in the media pool's browser. Right-click the file and select Add as Offline Reference Clip. Then right-click the timeline in the media pool window and select Timelines > Link Offline Reference Clip and choose the clip you just added.
Switch to the Edit pane and click the icon that looks like a filmstrip underneath the left-hand viewer. Choose Offline and Resolve will show the file you rendered from your NLE. You can then scrub through or play your timeline and it will show the reference clip alongside the corresponding frame of your timeline so you can compare them.

If any clips are offline you can right-click the timeline in the browser and select Timelines > Reconform from Bin(s), then select the bins with your source media. If the clips still won't reconnect, select the relevant clip in the media pool then right-click the offline clip in the timeline and choose Force Conform with Selected Media Pool Clip.
(At this point you may want to media-manage the timeline onto another drive to save disk space but I opted not to.)
Now go to the Color tab. If you don't see the grades you did previously, select all of the clips (you may need to click the Clips button at the top to see them) then right-click and choose Use Remote Grades (you may need to right-click again and choose Update All Thumbnails to see the changes).

Because you switched off local grades by default at the start of the project your grades were remote, which means they will stick across different timelines and if you adjust the grade of a clip, any other copies of it on your timeline (and throughout the project) will also be updated. In some cases this may not be desired, so you can right-click and choose Copy Remote Grades to Local so that your changes only apply to that specific instance of the clip.
Step 7: Sending back to the NLE
After grading you'll probably need to send it back to your NLE again for titling and syncing with the finished audio. You can do this one of two ways: export each clip individually like in Step 4 and then reconnect in your NLE (media managing before doing so will help a lot) or render out a single QuickTime file of the entire timeline. If you don't expect many editorial changes at this point the latter is simpler, which is what I opted for.
Posted by Jon Chappell on Feb 1 2016 to
Tutorials,
Color Grading,
Video EditingPermalinkRewrapping MP4 to MOV with CinePlay
I recently had a need to rewrap an MP4 to MOV without transcoding the existing H.264 video when it occurred to me that CinePlay for Mac makes an excellent rewrapping tool, despite this purpose not actually occurring to us during development.

Here's how to do it:
1. Open up the MP4 you wish to convert in CinePlay.
2. Go to File > Export.
3. Under both Video and Audio, select Don't Transcode (pass-through) and click Save.

The movie will be rewrapped to a separate MOV extremely quickly. Depending on how much video data needs to be copied over to the new file, it could be as short as a few seconds.
Posted by Jon Chappell on May 27 2015 to
Tutorials,
Software,
CinePlayPermalinkFixing offline files in media managed XML
When you media manage a project in Final Cut Pro 7 and then export to XML for importing into a third-party application like Davinci Resolve*, you may get an error message from that application saying it cannot reconnect to the files.

The reason for this is that when FCP 7 creates a new media file (which it does if it trims unused content) it gets created without a .mov extension which can confuse other applications into thinking it is not a media file.

Here's how to fix it:
1. Use a batch renaming tool to find and replace -v with -v.mov (note the dash at the beginning) for the files in your media managed folder.

2. Open up the XML file in a text editor like TextWrangler and find and replace
-v</pathurl>
with
-v.mov</pathurl>
.

3. Save the XML file then try the import again.
* The "ignore file extensions" option in Davinci Resolve is supposed to prevent issues like this but this problem still occurs when that box is checked.
Understanding render options in Adobe Premiere Pro
Adobe Premiere Pro's export dialog features several rendering options that are not widely understood. All of them are switched off by default because they either degrade quality or increase rendering times, however they can all be useful in particular situations.

Render at Maximum Depth
This renders content at 32-bit color depth. Very few output formats actually support 32-bit color but processing at this depth can produce better quality for compositing and effects operations before being scaled back to the output format's bit depth. It can reduce or eliminate artifacts and banding in your video but that benefit comes at the cost of an increase in processing time, so only use it when completely necessary.
You may benefit from this option in the following situations:
- Your source media has a higher bit depth than the format you are outputting to
- Your sequence contains heavy compositing or lots of layered effects (particularly 32-bit color effects)
- Your sequence contains very high contrast or very low contrast images (for example subtle gradients)
You can read more about Premiere's color processing here.
Maximum Render Quality
This is a high-quality resize operation that should be used when outputting to a different frame size from your sequence. It can reduce aliasing (jagged edges) when resizing images but is of no use when outputting to the same frame size. This operation significantly increases render times so only use it when resizing.
Frame Blending
This option smooths out juddery motion when exporting to a different frame rate than your sequence. While it may improve motion quality compared to not having it switched on, it's not considered a high quality option. You will probably get better results from exporting with the sequence frame rate and then converting in Adobe Media Encoder, Apple Compressor, a standards-conversion tool like JES Deinterlacer or a hardware conversion device like Teranex.
Use Previews
This results in reduced export times because your sequence render files are used instead of having to re-render the sequence. This is of course assuming that you have a significant amount of your timeline already rendered, which may not be the case if you have a fast computer or your sequence is simple enough to be played back without rendering.
Generally you should not use this option because it is likely to result in reduced image quality, particularly when outputting to a different format from your sequence and also because it will bypass the quality options detailed above. It should only be used where processing time is more important than image quality, such as previews or rough cuts for example, although these are likely to be simple enough that this option doesn't significantly affect processing times.
Posted by Jon Chappell on Jan 12 2015 to
Adobe,
Tutorials,
Video EditingPermalinkHow to protect your video content
Sometimes it is necessary to protect video content against unauthorized redistribution. Here's an overview of the main ways of doing this.
Visible Watermarking
This involves placing text or a logo over the video to show the name of the company owning the content.

Pros
- Simple and free
- Doesn't require specialist software to create or view
- Its obvious visibility provides a deterrent
- Difficult to remove if placed in an area that cannot be cropped out
Cons
- Disrupts the movie
- Does not provide any physical protection mechanisms
- No feasible way to tie a movie to a particular person
- May increase movie encoding times
Invisible Watermarking
Some companies offer invisible watermarking by tagging content with a fingerprint. One such example would be Digimarc Guardian.
You would tag the movie and give it to the end user, then if it appears on a file-sharing website you can download it and read the tag to find out which user shared it.
Pros
- Quick to apply to an existing movie without re-encoding
- Can be tied to a specific user
- Does not disrupt the movie
Cons
- Requires specialist software to create and view
- Does not provide any physical protection mechanisms
Content Protection Plugins
Browser plugins like Flash and Silverlight offer their own Digital Rights Management (DRM) protection systems.
Pros
- A lot of control over exactly what the user can and cannot do. For example, you can make a movie unplayable after a certain time period.
- Offers a physical protection mechanism
Cons
- Requires a plugin, which may cause problems with less tech-savvy users
- May not be playable on mobile devices
- May be too expensive for smaller publishers (Adobe does not publish Adobe Access pricing)
HTML5 Content Protection (Encrypted Media Extensions)
This uses web technologies to allow content protection without the need for a plugin. It is frequently misunderstood as a protection mechanism in itself, but in actuality it is just a means of linking HTML5 web video with existing third-party protection systems, so a lot of the pros and cons of plugins still apply.
Pros
- No plugins needed
- A lot of control over exactly what the user can and cannot do. For example, you can make a movie unplayable after a certain time period.
- Offers a physical protection mechanism
Cons
- Currently very little browser support
- Needs to be integrated with an existing DRM system
- Expensive
Streaming
Streaming a file can make it difficult for users to download it, and for someone people this is all that is needed. This can be achieved with proprietary technologies like Adobe Media Server or HTML5 technologies like HTTP Live Streaming.
Pros
- Difficult to download files
- Fast playback times
- Additional features can be added like automatically changing playback quality to match the user's connection
Cons
- Requires preparation of the files in advance
- Can still be downloaded by tech-savvy users with specific software
- Some technologies require a streaming server
So which is best? That entirely depends on the content you are trying to protect.
- If you are trying to prevent a paying viewer from sharing a movie, DRM is the best way to go.
- If you are trying to prevent clients from using work in progress media without paying you, visible watermarking and/or streaming may be best.
- If you are trying to prevent a movie being leaked before its release, a combination of physical preventions, user tracking and deterrents may be required.
Posted by Jon Chappell on Nov 24 2014 to
DR News,
Tutorials,
AnalysisPermalinkUseful Avid Console Commands
Avid Media Composer features a little-known Console window that allows you to enter commands to tune performance, improve debugging and enable hidden features. Many of the commands are aimed at plugin developers but here is a list of several that are generally useful.
To access the Console, go to Tools > Console. Note that many commands will need to be re-applied the next time you launch Media Composer.
Allow editing over network drives
By default Avid will only recognize locally-attached hard disks. You can switch off this limitation to enable editing over a network share. Note: do not let others access the project at the same time.
AllDrives 1 - Switches it on
AllDrives 2 - Switches it off
List installed AMA plugins
Displays a list of installed AMA plugins and their version numbers. Plugins can also be enabled, disabled and removed through our Plugin Manager app.
AMA_ListPlugins
Cache audio before playback
Specifies how many seconds of audio to cache before starting playback. If you are getting ADM_COREAUDIO_UNDERRUN or similar errors, you may benefit from increasing this number. You can also decrease it on a fast computer to reduce the time taken to begin playback.
audiopreread [number in seconds]
Set still image default frame duration
When importing an image via the Import dialog the length can only be specified in seconds. This command allows you to specify it down to a frame.
Cmd_setimportslidelength [number in frames]
Conform imported QuickTimes to current sequence frame rate
This applies a rudimentary conform feature by overriding a movie's frame rate with the rate of the project. This can also be done with QT Edit.
IgnoreQTRate 1 - Switches it on
IgnoreQTRate 0 - Switches it off
Cache multicam frames
Multicam playback is very taxing on a computer because it requires the playback of multiple video and audio streams at once. To help improve this you can increase the number of frames Avid caches before playback starts.
multicampreload [number of frames]
Load precomputes into a monitor
Allows precomputes (render files) to be loaded into a monitor for playback and editing. You'll need to make precomputes visible in the bin before you can do this, by going to Bin > Set Bin Display and ticking Rendered Effects.
subsys monpane debug
Set timecode break threshold
This sets the interval at which to detect timecode breaks, in frames. Setting it to a high number might miss some timecode breaks; setting it to a low number might cause false positives. The default is 6.
TCBreakTolerance [a number between 2 and 12]
Toggle between PSF and progressive
Outputs video as Progressive Segmented Frames (PSF) instead of pure Progressive. Useful for compatibility with certain displays that don't support Progressive at higher resolutions or frame rates.
TogglePSF 1 - Switches PSF on
TogglePSF 0 - Switches Progressive on
Posted by Jon Chappell on Nov 18 2014 to
Avid,
Tutorials,
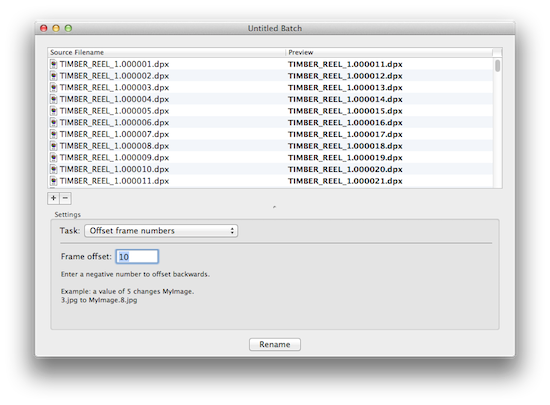
Video EditingPermalinkManaging frame sequences in Batch Renamer
There are many tools for batch renaming, including Finder in OS X 10.10 Yosemite, however most of these tools are not built with film and TV workflows in mind and therefore don't understand or operate well with image sequences.
Batch Renamer in Pro Media Tools has several features that make it invaluable for image sequence workflows.
Detect frame gaps
Did you render the correct portion of the clip? Did you copy every file you intended to? Batch Renamer allows you to check for missing frame numbers to help spot such issues.

Edit sequences
If you need to remove a shot, delete its frames and then use the Close Number Gaps option to renumber the other frames to fill in the gap.
Offset / reorder frame numbers
Did you render out with the wrong start frame? Choose Offset Frame Numbers to add or subtract a number of frames from each file. Alternatively, drag the files in the window to get them in the desired order manually then choose Reorder Frames.
Pad frame numbers
If you rendered out with the wrong frame padding (leading zeroes) it's easy to change this in Batch Renamer.
Reverse sequences
Need a VFX shot to play backwards without re-rendering it? Choose the Reverse Frame Numbers option.
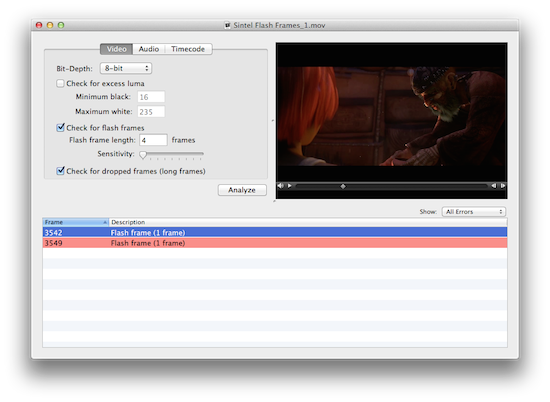
Batch Renamer is just one tool in the Pro Media Tools suite. Other popular tools include QT Edit, for batch-editing the properties of QuickTime movies (changing metadata, timecode, managing tracks) and Video Check, for locating faults in a video (flash frames, long frames, audio peaks).
To find out more about Pro Media Tools, check out the features page, watch the overview video, read the user manual or download the free 15-day trial.
Posted by Jon Chappell on Nov 12 2014 to
Tutorials,
Software,
Visual EffectsPermalinkFixing missing database errors in DaVinci Resolve
Upon launching DaVinci Resolve you may see the following error:
"Resolve did not locate a compatible or upgradable database."

Clicking past it shows an empty project view.
There are several possible causes including database corruption but a common one is caused by your PostgreSQL database being too large. This can cause PostgreSQL to request more shared memory than is allowed by OS X or Linux.
To determine the exact error on OS X, you can launch the Start Server app in your /Applications/PostgreSQL folder. If it fails to launch it will show an error message after about a minute or so. On Ubuntu the equivalent command would be sudo service postgresql start.

The error may not have the exact wording shown above but will be labeled "could not created shared memory segment".
There are two ways to fix this problem - either permanently or temporarily until your next reboot. I'd recommend trying the temporary option first because if something goes wrong you can just restart to fix it.
Temporary Fix
1. Enter the following command into the Terminal located in /Applications/Utilities:
sudo sysctl -w kern.sysv.shmmax=41943040
You'll need to enter your admin password after typing this.

2. Launch the Start Server app or type sudo service postgresql start on Ubuntu. If all went well, it should not report an error and Resolve should be able to see the database when you relaunch it.
3. If you still get an error, try the command again with a higher value then repeat Step 2. The memory limit is specified in bytes so multiply the number of megabytes by 1024 twice. PostgreSQL documentation recommends you use 1/4 of the available memory for this, although I was able to get it working with much less.
Permanent Fix
1. Back up the file /etc/sysctl.conf.
2. Use the following command to edit the file:
sudo nano /etc/sysctl.conf
3. Add the following line (or edit it if it already exists):
kern.sysv.shmmax=41943040
4. Press Ctrl + O to save the file, then reboot.
5. Resolve should now be able to see the database. If it can't, try increasing the memory limit further and reboot.
If you get into problems and your system refuses to boot, either boot into safe mode or use target disk mode to copy the backup file and then reboot.
Posted by Jon Chappell on Apr 28 2014 to
Color Grading,
Tutorials,
Video EditingPermalink KollaborateCloud platform for pro video
 Pro Maintenance ToolsMaintain, optimize and troubleshoot your editing system
 Pro Media ToolsMedia and workflow management for video pros
 CinePlayProfessional video player
 Post HasteCreate projects from customizable templates
 Preference ManagerTrash, backup, lock and restore preferences for your video apps
 FCS RemoverUninstall Final Cut Studio and FCPX
 Aspect Ratio Matte Generator
 Video Space Calculator

 Step 2: Organize and sync clips


