Avid AMA Best Practices
Avid Media Composer traditionally required all media files to be converted to its DNxHD Op-Atom MXF format but recent versions have allowed you to skip this process and import tapeless media instantly. This feature is called Avid Media Access (AMA). Media Composer ships with very few AMA plugins so to support additional camera formats you may need to download and install extra AMA plugins.
Using AMA is not without its pitfalls so here are some ways of reducing problems.
- The first thing to determine is if AMA is a viable workflow for your project. It's useful for short projects with a fast turnaround but Avid can get bogged down with longer and more complex sequences, especially where multicam is involved. AMA can be very useful at importing additional metadata so a common workflow is to mount the AMA volume or link to the AMA files and then transcode.
- It is recommended that you copy the camera media to another drive before importing. When doing so, make sure to keep the same folder structure and filenames as the original card or Avid may be unable to locate the media files or associated metadata. Auto Transfer is a useful tool for achieving this.
- Some AMA plugins may use the same file types, which can cause a conflict if Media Composer doesn't know which plugin to use for a particular file. For example, the ARRI Alexa MXF plugin can conflict with the Avid MXF plugin. When linking to AMA files it is therefore important to specify the exact plugin in the Enable dropdown of the Link to AMA File(s) dialog.

- Remember to unmount AMA volumes in Media Composer before unmounting them in the operating system.
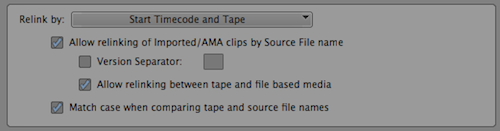
- AMA uses the Source field to identify the files. Beware of third-party applications that use the Tape Name field instead as they will not be able to relink in Media Composer 5.5 and below. A common workaround is to export an EDL of your sequence and then reimport it and relink. If you are using MC 6, be sure to select Allow relinking between tape and file based media in the Relink dialog.
- If you change the tape name or other metadata after transcoding / consolidating, you may be unable to reconnect to the AMA linked clips. Either don't modify the tape name or modify it before transcoding / consolidating.
- Using AMA will limit your options when exporting. If you want to export an AAF you will need to transcode to DNxHD. To do this, right-click on your sequence and select Transcode / Consolidate, select the desired DNxHD flavor and tick Create New Sequence. You will now be able to AAF export the new sequence.

Posted by Jon Chappell on Aug 28 2012 to
Avid,
Tutorials,
Video EditingPermalinkAdobe Dynamic Link troubleshooting
Dynamic Link is a key selling point of the Adobe suite that many people rely on for their workflows. Here's what to do if it doesn't work as expected. This article is mainly aimed to dynamic linking between After Effects and Premiere but many of the suggestions will apply to the other applications in the suite.

Make sure your compositions have unique names
If you have multiple After Effects projects dynamically-linked in your timeline, Premiere can get confused if the same comp names exist in multiple projects. It's important to name your comps something unique rather than choosing the default "Comp 1" name.
Don't add trailing numbers
Adding trailing numbers to a filename such as "01" or "v02" can interfere with After Effects' Increment and Save function. This can result in the wrong project appearing in your Premiere timeline.
Check your firewall
Your firewall may be preventing the dynamic link process from communicating with the other applications. Make sure your firewall is set to allow all Adobe applications and also the dynamiclinkmanager application located at
/Library/Application Support/Adobe/Common/dynamiclink/[CS suite version]/dynamiclinkmanager.

Disable simultaneous frame rendering
Dynamically linked projects do not support the Render Multiple Frames Simultaneously option. If you run into problems with it switched on, switch it off in the Memory and Multiprocessing tab of the preferences window in After Effects (it is off by default).

Clear caches and render files
If you find that the wrong project or composition is showing in your timeline, you may need to trash render files or your media cache in order to get it to display correctly. You can trash the render files by going to
Sequence > Delete Render Files and the media cache by going to the Media tab in preferences or by using
Pro Maintenance Tools.
Render as a movie file
If you still have problems after trying the steps above, render out the comp to a movie, import into Premiere Pro and replace the linked composition. This will of course remove the dynamic link and the advantages it offers, however you can right-click and choose Edit Original to relaunch the After Effects project if you need to re-render any changes.
Posted by Jon Chappell on Aug 20 2012 to
Adobe,
Video Editing,
TutorialsPermalinkPreference Manager best practices
Preference Manager is a useful tool for trashing preferences for a range of video editing applications including Avid, Premiere and all versions of Final Cut Pro. This wipes the user settings for your editing application and can fix a wide range of problems.
However, having to set everything up again can be a chore. With a little bit of preparation in advance, you can ensure you never have to trash them again.
1. Start with a stable foundation. We recommend trashing preferences in Preference Manager and then setting them up again from scratch in your NLE, but you can skip this step if you are confident that your settings are stable.

2. Backup the settings. You can choose to backup additional items such as keyboard layouts if you desire.

3. Optionally, lock your preference files to prevent them from becoming corrupt. Some apps don't work correctly with locked preference files, so for these apps the lock option will be greyed out.

4. When a problem occurs, instead of trashing preferences, restore the backup. This will restore the settings you backed up previously to enable you to get back to work quickly.

Additional tips:
- You can right-click on a backup in the Restore pane and set it as the default backup. This means that it will be automatically restored when running a Quick Fix and you can set it up to fix problems simply by pressing a button on your keyboard.
- If you make changes to your editing software preferences later on, right-click on the backup in the Restore pane and select Update All Files to replace the preferences in the backup with the current versions on disk.
- By default Preference Manager will autosave your preferences every 7 days. This allows you to go back to previously working settings if you did not make a backup beforehand
Preference Manager is a free and useful tool for editors and post production professionals. See the user manual for more workflow tips.
Posted by Jon Chappell on Aug 13 2012 to
Tutorials,
Video Editing,
UtilitiesPermalinkMaking Lion and Mountain Lion more like Snow Leopard
Until recently, most of our users were still using Snow Leopard. Then suddenly a massive switch occurred and a majority upgraded to Lion. This may have been because applications like Adobe Premiere and Avid Media Composer now require Lion or it may have been because the MobileMe shutdown forced people onto iCloud.
Whatever the reason, here are some tips for making 10.7 or 10.8 more welcoming for a 10.6 user.
Reverse scrolling
In Lion, Apple inverted the scroll direction so that up scrolls down and down scrolls up. Some people prefer this but you can switch it off by going to the Trackpad preference pane and deselecting
Scroll direction: natural in the Scroll and Zoom tab.
Works on: 10.7+
Show Finder status bar
By default, the Finder's status bar at the bottom is hidden. To switch it back on, go to View > Show Status Bar.
Works on: 10.7+
Show scroll bars
By default, scroll bars appear briefly in Lion and then disappear. This can be annoying because they briefly obscure the bottom file in a Finder window when in List mode. To make scroll bars always appear, go to the General preference pane and change Show scroll bars to
Always.
Works on: 10.7+
Hide All My Files
In Lion every Finder window opens into a section called All My Files, which shows every file in your user directory in one place. I much preferred the old way of showing the Home folder, so you can hide All My Files by going to Finder preferences and then deselecting All My Files in the Sidebar tab.
You can also set it to default to the home folder by going to the General tab and choosing your home folder in the "New Finder windows show" popup.
You may also like to show your hard drives and DVDs on the Desktop, which can be set from the General tab.
Works on: 10.7+
Stop restoring windows
Lion restores your previous windows when you restart an application. Apple provides an option in the General preference pane that allows you to deselect
Restore windows when quitting and re-opening apps. In Mountain Lion the option is called
Close windows when quitting an application and should be ticked.
However, in practice, these options have never worked reliably for me and applications will often try to restore old windows regardless. I therefore close windows manually before quitting an application and this fixes the problem.
Works on: 10.7+

Restore classic Expose grouping
Mountain Lion provides a new option in the Mission Control preference pane called
Group windows by application. Deselecting this restores the 10.5 and 10.6 behavior of showing every window on the screen, regardless of which application it belonged to.
Works on: 10.8+
Dictation
Dictation is activated by pressing the Fn (function) key twice. Everything you say is sent to Apple's servers so businesses may wish to steer clear of this feature. To switch it off, go to the Dictation & Speech preference pane and set the radio button to Off.
Works on: 10.8+
Notification Center
Mountain Lion includes a new iOS-style Notification Center. To switch it off for 24 hours, Option-click the icon in the far right of the menu bar.

Here is a tip for removing the icon completely but you should do it at your own risk.
Works on: 10.8+
Turn off autosave
Mountain Lion provides a new option in the General preference pane called
Ask to keep changes when closing documents. This essentially turns off the autosave feature added in Lion.
Works on: 10.8+
Posted by Jon Chappell on Aug 6 2012 to
Tutorials,
Apple,
SoftwarePermalinkHow to fix hasplmd crashes
If you run Avid Media Composer 6 on Lion you may have experienced an issue where a process called hasplmd crashes literally every 10 seconds. This fills up your Console logs very quickly and causes the crash reporter to be constantly running and writing to the hard drive.
Here's a an example of my Console log (abridged):
7/15/12 8:18:10.906 PM ReportCrash: Saved crash report for hasplmd[70958] version ??? (???) to /Library/Logs/DiagnosticReports/hasplmd_2012-07-15-201810_localhost.crash
7/15/12 8:18:21.040 PM ReportCrash: Saved crash report for hasplmd[70968] version ??? (???) to /Library/Logs/DiagnosticReports/hasplmd_2012-07-15-201821_localhost.crash
7/15/12 8:18:31.208 PM ReportCrash: Saved crash report for hasplmd[70969] version ??? (???) to /Library/Logs/DiagnosticReports/hasplmd_2012-07-15-201831_localhost.crash
7/15/12 8:18:41.378 PM ReportCrash: Saved crash report for hasplmd[70974] version ??? (???) to /Library/Logs/DiagnosticReports/hasplmd_2012-07-15-201841_localhost.crash
7/15/12 8:18:51.620 PM ReportCrash: Saved crash report for hasplmd[70986] version ??? (???) to /Library/Logs/DiagnosticReports/hasplmd_2012-07-15-201851_localhost.crash
hasplmd is used for dongle verification, although it took me a while to notice because I use Avid with a dongle and it worked just fine in spite of the crashes.
To fix this, download the newer 6.23 version of the drivers here (I chose the GUI version).
Alternatively, to disable hasplmd completely, type the following command in the Terminal:
sudo launchctl unload -w /Library/LaunchDaemons/com.aladdin.hasplmd.plist
You'll need to type your password after doing this.
Posted by Jon Chappell on Jul 16 2012 to
Avid,
Software,
TutorialsPermalinkHow to create timecode tracks for H.264 movies in Compressor
I had this question asked to me the other day so I thought I'd write a quick article on it. You may have noticed that Compressor does not create H.264 files with timecode tracks when using the Apple Devices presets.
The reason for this is that MP4 and M4V files do not support timecode. However, the MP4 specification is based on the QuickTime file format so it's easy to create a QuickTime movie (.mov) instead of an MP4 and the file will still be recognized by iOS devices and the Apple TV.

To do this, simply add an Apple Devices preset to a file and then change the file extension to mov in the Encoder tab of the Settings window. Compressor will then create an iOS and Apple TV-compatible H.264 with a timecode track.
Posted by Jon Chappell on Jul 9 2012 to
Tutorials,
Final Cut Studio,
QuickTimePermalinkUsing folder breaks to create folder hierarchies in Post Haste
Post Haste is a Mac and Windows app to organize your projects from customizable templates. You can setup various parameters to include in the folder name such as project name, client, date, etc.
In the recent rewrite of Post Haste we added a new feature called folder breaks. Folder breaks can be set on a per-parameter basis and tell Post Haste to create a new folder at the start of that parameter. This allows you to create folder hierarchies and is best explained through example.
Folder breaks can be added by ticking the relevant checkbox next to a parameter in the preferences window.

Here are some examples of how folder breaks affect the destination path of the project, using the parameter values shown in the screenshot below.

If all folder breaks are switched off, Post Haste will create a single folder with each parameter separated by an underscore (or whatever separator character you have chosen).

If a folder break is added for the Project parameter, Post Haste will create a new folder and all subsequent parameters will be appended to the project name with an underscore.

If a folder break is added for the Project parameter but the parameter value is left blank, Post Haste is smart enough to apply the folder break to the next valid parameter value.

If a folder break is added for Project and Editor, Date is appended to Project and Editor becomes a new folder.

If a folder break is added to all of the parameters, it looks like the following:

Post Haste allows filename conventions and project organization to be largely invisible to the end-user. Folder breaks make it easier to fit the app into existing naming conventions and are very useful for corporate environments.
Post Haste is a free app for Mac and Windows and is available here.
Posted by Jon Chappell on Apr 5 2012 to
Tutorials,
Software,
Video EditingPermalinkHow to create installers for your plugins and effects
If you are a plugin developer, Plugin Manager in Pro Maintenance Tools can be used to create installers. These provide an easy way for end-users to install plugins quickly and easily with very little setup required from the developer. Installers are completely self-contained so end-users do not need Pro Maintenance Tools installed.
To create an installer:
1. In the main plugin view, select the plugins or groups that you would like to add to the installer. You can have more than one plugin in an installer.

2. Go to Tools > Create Plugin Installer.
3. In the window that appears, specify a name for the plugin or group or plugins, the version number and author.

4. The code signing pane allows you to sign the installer to show that it hasn't been modified by an unscrupulous third party. This is necessary for running the installer on OS X 10.8 or higher.
Signing is optional for users on OS X 10.7 and below but it is recommended if you have access to a valid certificate. Visit Apple's developer site for more details on creating and installing a Developer ID certificate.
Once the certificate is installed, select it from the list in the Code Signing tab.

5. Click Create Installer and you will be prompted for a location.
6. Test the installer by moving the plugins you added to the installer to another location such as the Desktop, running the installer and then checking in Plugin Manager to see if the plugins were installed correctly.

7. Users can choose the Install button to install plugins to their default location or they can click Send to Plugin Manager to import with more options.
Plugin Manager is a comprehensive tool for managing your plugins. It is available as part of Pro Maintenance Tools.
Posted by Jon Chappell on Apr 3 2012 to
Tutorials,
Software,
DeveloperPermalinkWhat does that error message mean?
Sometimes your NLE will throw up a cryptic error while you are editing, such as "General Error 41" (Final Cut Pro) or "BAD_MAGIC" (Avid). Such errors are often meaningful to the application's developers but not its users.
Luckily Crash Analyzer in Pro Maintenance Tools has a comprehensive error database. Click the Error Lookup button in the toolbar and you will be presented with a searchable list of all supported errors (over 200 at the current time of writing).
Selecting an error presents an explanation of the cause with suggestions on how to overcome it. This can be a real timesaver when a cryptic message pops up on a deadline.

A full list of supported errors is available here and we add new ones in every software update. If you receive an error message that is not supported by Crash Analyzer, you can submit it for inclusion in a future version from the Actions menu.
Crash Analyzer is available as part of Pro Maintenance Tools. We also have an iOS app called EditCodes that uses the same database.
Posted by Jon Chappell on Apr 2 2012 to
Tutorials,
Software,
Video EditingPermalinkImproving tapeless media management with Auto Transfer
Working with tapeless media requires a robust organization and backup policy to ensure your footage remains safe.
One key area of concern is memory cards and readers, as cheaper ones can sometimes behave erratically when they get hot, causing data corruption. Worse still, OS X's Finder will not always show an indication that footage is corrupt when you copy it to your hard drive.
If your camera shoots to QuickTime movies, you should at the very least browse to the copied location and scroll through the directory to spot movie clips without thumbnails, as this may indicate files that are unreadable.
Another potential issue is directory structure. While it may be tempting to copy just the movie clips to your hard drive, some applications and Log and Transfer plugins are expecting the files to exist in a particular place within the directory hierarchy. Not maintaining this structure can lead to files being imported without metadata and timecode or sometimes not importing at all, depending on the application or plugin.
Auto Transfer is a tool for simplifying these problems. It can automatically copy the contents of your memory cards to multiple locations for safety. It also performs checksums on the copied files to ensure they are exactly the same as those on the card.

If a file fails the verification check, Auto Transfer allows you to try copying the file again. The Info pane keeps a record of how many times a failure occurs when copying from a particular card, which is a very useful indicator of a card that's potentially faulty.
Auto Transfer copies the full directory structure from a card, which ensures that it will be able to be read correctly by your NLE and companion apps. It can copy multiple cards simultaneously.
You can also specify additional metadata which can be used to create a custom directory structure, similar to our project management app Post Haste. For example, you could instruct Auto Transfer to create a new folder for each shooting day and put the relevant day's card contents in that folder. Alternatively you could create a directory structure based on the reel, project name and date. It's very customizable and is great for businesses that wish to have a consistent naming convention.

The metadata can also be added to a spreadsheet. There is one spreadsheet per project and each card is added to a new row at the end of the sheet. This allows you to have a printable record of any data you wish to track such as the reel number, scene information, description and more. The columns are customizable.

Various actions are available upon a successful transfer including Growl notifications (see our tutorial for sending Growl notifications to an iOS device), playing a sound effect, ejecting the drive, showing the files in Finder and much more.

Auto Transfer is an essential tool for DITs and anyone who deals with tapeless media. It is available as part of Pro Media Tools and there is a 15-day trial available here.
Posted by Jon Chappell on Mar 29 2012 to
Tutorials,
Software,
CamerasPermalink KollaborateCloud platform for pro video
 Pro Maintenance ToolsMaintain, optimize and troubleshoot your editing system
 Pro Media ToolsMedia and workflow management for video pros
 CinePlayProfessional video player
 Post HasteCreate projects from customizable templates
 Preference ManagerTrash, backup, lock and restore preferences for your video apps
 FCS RemoverUninstall Final Cut Studio and FCPX
 Aspect Ratio Matte Generator
 Video Space Calculator


