Notarizing plugin installers with Plugin Manager
On macOS 10.15 and higher, all applications are required to be notarized by Apple in order to launch. To do this you will need to have a paid Apple Developer account.
Before notarization, installers must also be code signed with your Developer ID Application (not Developer ID Installer) certificate. You can either download this certificate from https://developer.apple.com or let Xcode install it for you.
Plugin Manager 2.3 and higher includes the ability to notarize plugin installers directly. Here is the workflow for doing so:
- Select the plugins you wish to create an installer for within Plugin Manager, then go to Tools > Create Plugin Installer.
- In the window that appears, specify a name for the plugin or group of plugins, the version number and author.
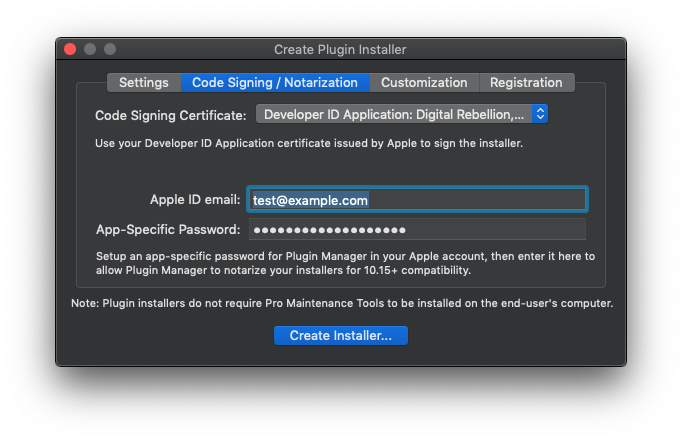
- In the Code Signing / Notarization tab, make sure your Developer ID Application is selected in the Code Signing Certificate dropdown.

- Enter the email address of your Apple developer account in the Apple ID email field.
- Plugin Manager can't use your developer account login password directly so you will need to create an app-specific password for Plugin Manager to use. To do this, login to your developer account at https://appleid.apple.com and click Generate Password under App-Specific Passwords. Paste the password you generated into the App-Specific Password field in the Create Installer window.

- Now click Create Installer. Note that notarization is not an instant process and Plugin Manager needs to keep checking with Apple to see if notarization has finished. Apple says that notarization may take up to 1 hour, but a realistic expectation would be 2-10 mins.
Once notarization has finished, Plugin Manager automatically staples the notarization directly to the installer for you. Note that you could technically cancel the notarization process while it's waiting for Apple and the installer would still work, however the purpose of stapling the notarization is to prevent macOS having to check in with Apple's servers. An un-stapled installer therefore would require the user to be connected to the internet and may incur a delay before the installer can be launched.
- If you are distributing your installer on a disk image, you will also have to notarize the disk image. To do this, create the disk image as normal, then go to Tools > Notarize Installer Disk Image in Plugin Manager. Browse for the disk image on your hard drive and Plugin Manager will go through the same process again for the disk image.
Â
Posted on Nov 11 2019. Last updated Nov 11 2019

